驱动模块的加载与卸载
  insmod xxx.ko //加载驱动模块
  rmmod xxx.ko  //卸载驱动模块
  module_init(xxx_init);//注册模块加载函数
  module_exit(xxx_exit);//注册模块卸载函数
使用insmod命令加载驱动模块,在调用insmod命令时候,驱动中的mudule_init();函数就会被调用。
使用rmmod命令卸载驱动模块,在调用rmmod命令时,驱动中的module_exit();函数就会被调用。
问题1:linux系统如何知道mudule_init()和module_exit()是驱动的入口函数和出口函数?
答案:mudule_init()需要用"__init"来修饰,module_exit()需要用"__exit"来修饰。
问题2:驱动的入口函数和出口函数为何要用ststic修饰?
答案:static修饰后的函数为静态函数,它不能被其他文件所用,起隔离作用。
所以字符驱动设备模块加载和卸载函数的模板如下
/*驱动入口*/
static int __init xxxx_init(void)
{
  /*填入具体内容*/
  return 0;
}
/*驱动出口*/
static void __exit xxxx_exit(void)
{
  /*填入具体内容*/
}
/*指定模块的入口函数和出口函数*/
module_init(xxxx_init);
module_exit(xxxx_exit);
字符设备的注册与注销
当调用insmod命令加载设备驱动时,module_init会调用执行xxxx_init;那么怎么能让系统知道我们加载了一个什么驱动。则就需要进行驱动的注册。同理,我们卸载驱动时,也需要进行驱动的注销
函数原型如下:
  static inline init register_chrdev(unsigned int major, const char *name, const struct file_operations *fops);
  static inline void unregister_chrdev(unsigned int major, const char *name);
各个参数的意义如下:
- major:主设备号
- name:设备名称
- fops:结构体 file_operation类型指针(后面再详细写)
字符设备的注册与注销模板如下
static struct file_operations xxx_fops

static int __init xxx_init(void)
{
    int retvalue = 0;

    retvalue = register_chrdev(200, "xxx", &xxx_fops);
    if(retvalue < 0){
      return -1;
    }
    return 0;
}

static void __exit xxx_exit(void)
{
    unregister_chrdev(200, "xxx");
}

module_init(xxx_init);
module_exit(xxx_exit);
file_operation结构体介绍
struct file_operations {
    struct module *owner;
    ssize_t (*write) (struct file *, const char __user *, size_t, loff_t *);
    ssize_t (*read) (struct file *, char __user *, size_t, loff_t *);
    int (*open) (struct inode *, struct file *);
    int (*release) (struct inode *, struct file *);
    ......//省略其他
};- owner拥有该结构体的模块的指针,一般设置为THIS_MODULE
- write函数用于向设备文件写入(发送数据)
- read函数用于读取设备文件
- open函数用于打开设备文件
- release函数用于释放(关闭)设备文件
- 其他的后面再做笔记
在linux中一切皆文件,驱动加载成功后,会在/dev目录下生成一个相应的文件,应用程序通过访问这个名为/dev/xxx的文件实现对驱动的控制。一般对文件的操作有open、close、write、read。
以open函数为例,我们在应用程序中调用open函数,这个函数是C库提供给应用使用的,C库则会通过系统调用陷入到内核中调用驱动的open函数
所以我们要在驱动中实现file_operations中的write、read、open、release函数。通过注册设备函数提供给系统,供应用使用。
设备具体操作函数具体实现
/*打开设备*/
// inode:传递给驱动的inode
// filp:设备文件
static int xxx_open(struct inode *inode, struct file *filp)
{
  /*用户实现具体功能*/
  return 0;
}
/*关闭设备*/
// inode:传递给驱动的inode
// filp:设备文件
static int xxx_release(struct inode *inode, struct file *filp)
{
/*用户实现具体功能*/
return 0;
}/*从设备读取*/
// filp:要打开的设备文件(文件描述符)
// buf:返回给用户空间的数据缓冲区
// cnt:要读取的数据长度
// offt:相对于文件首地址的偏移
static ssize_t xxx_read(struct file *filp, char __user *buf, size_t cnt, loff_t *offt)
{
/*用户实现具体功能*/
return 0;
}/*从设备读取*/
// file:设备文件
// buf:要写入设备的数据
// cnt:写入的数据长度
// offt:相对于文件首地址的偏移
static ssize_t xxx_write(struct file *filp, const char __user *buf, size_t cnt, loff_t *offt)
{
/*用户实现具体功能*/
return 0;
}添加LICENSE和作者信息
MODULE_LICENSE() //添加模块 LICENSE 信息
MODULE_AUTHOR() //添加模块作者信息
许可信息填写GPL,作者信息填写自己的即可, LICENSE 是必须添加的,否则的话编译的时候会报错,作者信息可以添加也可以不添加。
file_operations结构体变量的实现
我们虽然定义的file_operations xxx_fops。并且xxx_fops可以通过注册设备函数传递给系统,但是xxx_fops是个空的,需要我们初始化它。结构如下。
static struct file_operations xxx_fops = {
    .owner = THIS_MODULE,
    .open = xxx_open,
    .read = xxx_read,
    .write = xxx_write,
    .release = xxx_release,
};
其中.owner固定赋值为THIS_MODULE
至此驱动部门完成了,具体实现代码如下。
  #include <linux/types.h>
  #include <linux/kernel.h>
  #include <linux/delay.h>
  #include <linux/ide.h>
  #include <linux/init.h>
  #include <linux/module.h>


  #define CHRDEVBASE_MAJOR    200
  #define CHRDEVBASE_NAME     "chrdevbase"

  static char readbuf[1024];
  static char writebuf[1024];
  static char kerneldata[1024]={0};

  static int chrdevbase_open(struct inode *inode, struct file *filp)
  {
      printk("chrdevbase open!\r\n");
      return 0;
  }


  static ssize_t chrdevbase_read(struct file *filp, char __user *buf, size_t cnt, loff_t *offt)
  {
      int retvalue = 0;

      if(cnt <= 1024){
          memcpy(readbuf, kerneldata, cnt);
          retvalue = copy_to_user(buf, readbuf, cnt);
      }else{
          memcpy(readbuf, kerneldata, 1024);
          retvalue = copy_to_user(buf, readbuf, 1024);
      }
      if(retvalue == 0){
          printk("kernel senddata success!\r\n");
      }else{
          printk("kernel senddata failed!\r\n");
      }
      return 0;
  }

  static ssize_t chrdevbase_write(struct file *filp, const char __user *buf, size_t cnt, loff_t *offt)
  {
      int retvalue = 0;

      if(cnt <= 1024){
          retvalue = copy_from_user(writebuf, buf, cnt);
      }else{
          retvalue = copy_from_user(writebuf, buf, 1024);
      }
      memcpy(kerneldata, writebuf, strlen(writebuf));
      if(retvalue == 0){
          printk("kernel receive data success!\r\n");
      }else{
          printk("kernel receive data failed!\r\n");
      }
      return 0;
  }

  static int chrdevbase_release(struct inode *inode, struct file *filp)
  {
      // printk("chrdevbase release!\r\n");
      return 0;
  }

  static struct file_operations chrdevbase_fops = {
      .owner = THIS_MODULE,
      .open = chrdevbase_open,
      .release = chrdevbase_release,
      .read = chrdevbase_read,
      .write = chrdevbase_write
  };


  static int __init chrdevbase_init(void)
  {
      int retvalue = 0;

      retvalue = register_chrdev(CHRDEVBASE_MAJOR, CHRDEVBASE_NAME, &chrdevbase_fops);
      if(retvalue == 0){
          printk("chrdevbase init success\r\n");
      }else{
          printk("chrdevbase init failed\r\n");
      }
      return 0;
  }

  static void __exit chrdevbase_exit(void)
  {
      unregister_chrdev(CHRDEVBASE_MAJOR, CHRDEVBASE_NAME);
      printk("chrdevbase exit success!\r\n");
  }

  module_init(chrdevbase_init);
  module_exit(chrdevbase_exit);

  MODULE_LICENSE("GPL");
  MODULE_AUTHOR("warren");
测试软件代码如下
#include "stdio.h"
#include "unistd.h"
#include "sys/types.h"
#include "sys/stat.h"
#include "fcntl.h"
#include "stdlib.h"
#include "string.h"

static char usrdata[]={"usr data!"};


int main(int argc, int **argv)
{
    int fd, retvalue;
    char *filename;
    char readbuf[1024];
    char writebuf[1024];

    if(atoi(argv[2]) == 1){
        if(argc != 3){
            printf("Error Usage!\r\n");
            return -1;
        }
    }else{
        if(argc != 4){
            printf("Error Usage!\r\n");
            return -1;
        }
    }
    filename = argv[1];
    fd = open(filename, O_RDWR);
    if(fd < 0){
        printf("Can't open %s\r\n", filename);
    }
    if(atoi(argv[2]) == 1){
        retvalue = read(fd, readbuf, 1024);
        if(retvalue != 0){
            printf("read file %s failed\r\n", filename);
            return -1;
        }else{
            printf("read data: %s\r\n", readbuf);
        }
    }
    else if (atoi(argv[2]) == 2){
        memcpy(writebuf, argv[3], strlen(argv[3]));
        retvalue = write(fd, writebuf, strlen(argv[3]));
        if(retvalue != 0){
            printf("write file %s failed!\r\n", filename);
        }else{
            printf("write data %s success!\r\n", argv[3]);
        }
    }
    retvalue = close(fd);
    if(retvalue != 0){
        printf("Can't Close file %s\r\n", filename);
        return -1;
    }
    return 0;
}
驱动程序和应用程序编译
//编译驱动模块的MAKEFILE文件
KERNELDIR    :=    /home/warren/linux/linux_source_code/linux-imx-rel_imx_4.1.15_2.1.0_ga_alientek
CURRENTDIR    :=    $(shell pwd)

obj-m    :=    chrdevbase.o

build:    kernel_modules

kernel_modules:
    $(MAKE)    -C    $(KERNELDIR)    M=$(CURRENTDIR)    modules
clean:
    $(MAKE)    -C    $(KERNELDIR)    M=$(CURRENTDIR)    clean
MAKEFILE知识后面再补吧,先暂时当一下烂娃。
编译驱动模块和应用的脚本及拷贝到tftp文件夹,准备让开发板获取。
#!/bin/bash
make clean
make
rm -rf chrdevbaseApp
arm-linux-gnueabihf-gcc chrdevbaseApp.c -o chrdevbaseApp
rm -rf ../../tftpboot/*
cp c*App *.ko ../../tftpboot
chmod 777 ../../tftpboot/*
测试及验证
进入在开发板的根文件系统/lib/modules/4.1.15文件夹
使用tftp命令获取chrdevbase.ko文件和chrdevbaseApp文件
tftp -g -r chrdevbase.ko 192.168.0.100
tftp -g -r chrdevbaseApp 192.168.0.100
给chrdevbaseApp权限
chmod 777 chrdevbaseApp使用insmod命令加载驱动模块
insmod chrdevbase.ko
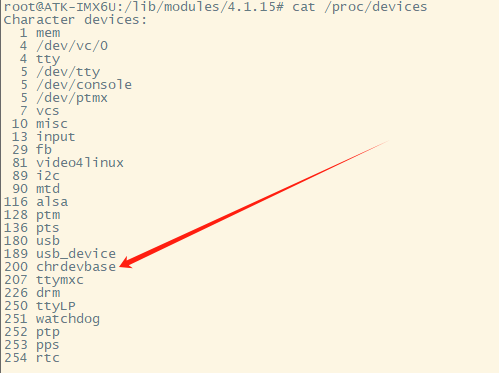
查看当前系统中的所有设备
ccat /proc/devices
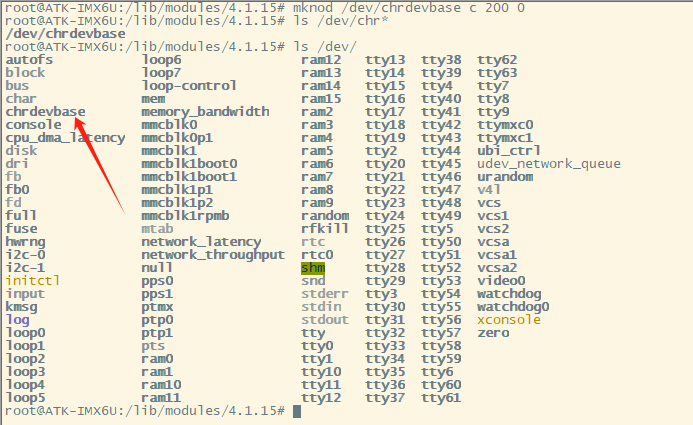
创建设备节点文件
mknod /dev/chrdevbase c 200 0

// mknod:创建节点命令
// /dev/chrdevbase:要创建的节点文件
// c:代表字符
// 200: 主设备号
// 0:次设备号
查看/dev/下的节点文件
下来调用chrdevbaseApp来对/dev/chedevbase这个节点文件进行操作。
./chrdevbaseApp /dev/chrdevbase 2 warren
./chrdevbaseApp /dev/chrdevbase 1
结束,撒花!!! 


评论 (0)